If you’re running a custom embroidery biz, or just starting out and tired of designing every little stitch from scratch, importing pre-made designs into your computerized embroidery machine is such a game-changer. It cuts down on prep time, lets you take on more orders, and means you can offer your clients way more variety without pulling all-nighters. As someone who’s worked with embroidery machines for years—first troubleshooting them, then as part of a supplier for these machines— I’ve seen so many folks get tripped up on this step. Some think it’s as easy as dragging a file onto a USB, others stress over “wrong formats” or “broken connections” that mess up their whole design. Today, I’m breaking this down like I would with a new customer who just got their first machine and is staring at a folder of designs, wondering where to start. No fancy jargon, no confusing steps—just what actually works. Computerized Embroidery Machine
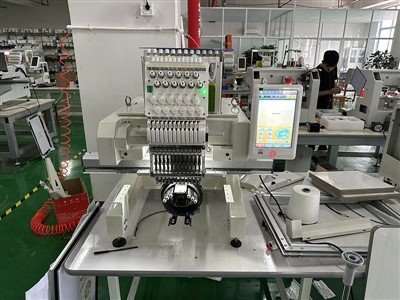
First, let’s get the basics straight: not all design files are created equal, and your machine can only read certain ones. I can’t tell you how many times a customer has come to me saying, “I imported my JPG and it won’t stitch!” That’s because JPGs are photos, not embroidery files. Embroidery machines need files that tell every stitch where to go, what color to use, and when to jump. These are called “formats,” and the most common ones for computerized embroidery are PES (that’s Brother’s format, super widely used), DST (the industry standard, works on almost every machine), EXP (Melco), and JEF (Janome). Before you even plug in a USB or open your machine’s software, double-check your machine’s manual to confirm which formats it supports. For example, if you have a hobby-level machine, it might only take DST or PES, while industrial models can handle a few more. Pro tip: when you’re buying pre-made designs online, look for sellers that offer DST as a download option— it’s the safest bet to avoid compatibility headaches.
Next, let’s talk about the two main ways most people import designs: using a USB drive (the simplest, most popular method for most folks) and using a computer with your machine’s companion software (better for editing designs before importing, especially if you need to tweak a size or color). I’ll start with USB because that’s what 90% of my customers use. Here’s how to do it without messing up:
First, make sure your USB is formatted correctly. A lot of people grab any old USB they have lying around, but if it’s got random files, folders, or even a virus, that can cause issues. Stick to a small USB (under 32GB works best) that’s empty or only has your embroidery design files on it. Format it to FAT32— that’s the file system most embroidery machines can read. If you’re on Windows, right-click the USB in File Explorer, click “Format,” and pick FAT32 from the options (make sure “Quick Format” is checked, that’s all you need). On a Mac, it’s a tiny bit different: open Disk Utility, select your USB, go to “Erase,” and pick MS-DOS (FAT) — that’s the same as FAT32. If you skip this step, your machine might not recognize the USB at all, or it’ll read the files as corrupted. Trust me, I’ve had a customer spend an hour panicking because their 64GB USB wouldn’t work, and all we had to do was reformat it.
Once your USB is ready, put your design file on it. Wait— make sure the file isn’t too big for your machine’s hoop! If you’re using a 4×4 hoop, a design that’s 5×5 inches won’t fit, and your machine will either skip parts or stretch it weird. Most pre-made design sellers list the size, so double-check that before you save it to the USB. Plug the USB into your machine’s port (usually on the front, sometimes on the side) and turn the machine on. Wait 10-15 seconds for it to detect the USB— don’t yank it out right away. Once it pops up on the screen, use the machine’s arrow buttons to navigate to your design file, select it, and wait for it to load. Now, this is where a lot of people mess up: after it loads, check the preview! The machine will show a little stitch-out of what it’s going to make. If parts look distorted, or the size is wrong, don’t stitch it yet. You can adjust the size on the machine itself (most have a resize function— just don’t stretch it more than 10% or the stitches will get loose and fall apart) or even pick a different color if you hate the one it defaulted to.
Now, what about the software method? This is for when you want to edit your design before importing it. Like, if a client wants a name added to a premade logo, or you need to shrink a design to fit a small shirt, the machine’s companion software is your best friend. Almost every computerized embroidery machine comes with free software when you buy it— we include a basic design editing program with all our machines, for example. Here’s how that works: first, install the software from the CD that came with your machine (or download it from our website if you lost the CD). Open it up, and import your design file (most software lets you drag and drop, or go to “File > Import”). From there, you can change colors, resize, add text, or even combine multiple designs into one. When you’re done editing, export it as a format that your machine accepts (again, DST is safe) and save it to your USB, then follow the same steps as before to load it onto the machine. I should note: if you’re using a third-party software like Wilcom (which is for more advanced users), make sure you export in the right format for your machine. A common mistake is exporting as an SVG (which is a vector file, not embroidery) — SVG is for printing, not stitching, so that’ll never work.
Wait, let’s talk about common mistakes I see all the time, because even after following these steps, things can go wrong. First, don’t rename the file after you save it to the USB. If you have a file called “bear-design.dst” and you rename it to “my-bear.dst” on the USB, some machines won’t recognize it— they need the original file name that has the format extension (like .dst or .pes). Second, don’t use a USB that’s got multiple versions of the same design. If your USB has “bear-design.dst,” “bear-design(1).dst,” and “bear-design-final.dst,” your machine might pick the wrong one or get confused. Third, if your design won’t load at all, try converting it to DST. There are free online converters (just be careful with sketchy ones that have malware) that can turn PES, JEF, or other formats into DST. If you’re stuck, shoot us a message— we can help you convert it for free if you’re a machine owner.
Another thing: hooping matters even when you’re using a premade design. A lot of people think the design is the only thing that affects the end result, but if you hoop your fabric too tight or too loose, the stitches will pucker or shift, even if the design imported perfectly. That’s a whole other topic, but it’s worth mentioning because importing a design that looks great on screen is wasted if your hooping is off.
Now, why does this matter for you as a machine user? If you’re a small business owner, importing pre-made designs lets you take on custom orders way faster. Say a client wants a logo on a hoodie— instead of designing the logo from scratch, you can import their logo file (as long as it’s a compatible format) or use a premade logo from a seller, tweak it, and get stitching in 15 minutes. That means you can turn around orders in a day instead of a week, which keeps clients happy and makes more money. For hobbyists, it means you can make custom gifts (like birthday shirts, team jackets, or pet bandanas) without having to learn complicated design software.
Wait, should you buy pre-made designs or make your own? That’s up to you, but importing them is way more flexible than you might think. I’ve had customers import designs from Etsy, Facebook groups, and even Instagram— as long as you get the right file format, it works. Just make sure you’re buying designs from reputable sellers who offer commercial use licenses, especially if you’re using them for business. Some designs are for personal use only, and using them on products you sell can get you in trouble. That’s a quick tip I don’t see enough people talk about.
So, let’s recap the steps to make sure you’ve got it all straight: 1. Confirm your machine’s compatible file formats. 2. Format your USB to FAT32, load only your design files on it (no renaming!). 3. Plug into the machine, wait for it to detect, select your design, check the preview. 4. Adjust size/colors if needed, then hoop your fabric and stitch. If you use software, add the step: edit your design, export in the right format, then save to USB.
If you’re still feeling unsure, or you just got a new machine and haven’t tried importing designs yet, don’t stress— we’re here to help. A lot of first-timers overcomplicate it, but once you do it once, it’s super straightforward. If you’re in the market for a computerized embroidery machine, we have a range of options from hobby-level to industrial, all with easy import tools and step-by-step guides to make this process even simpler. Just reach out to our team to chat about which machine fits your needs, and we can walk you through any questions you have about importing designs, formats, or anything else embroidery-related. We’re not just here to sell you a machine— we’re here to make sure you can use it to its full potential, even when you’re working with premade designs.
Wait, one last thing for the road: test your design on a scrap fabric first. Always, always, always. Stitch a small version on a piece of leftover fabric to make sure the stitches look right, no skipped areas, no weird spacing, before you use a nice client’s shirt or a expensive fabric. That’s a tiny step that saves so many mistakes.
I know this seems like a lot, but once you do it once, it becomes second nature. Importing premade designs is such a time-saver, and it’s way easier than most people think. Don’t let the fear of “wrong files” or “broken machines” stop you from trying it. If you hit a snag, just ask for help— that’s what we’re here for.
Flat Embroidery Machine References:
- Smith, L. (2022). Embroidery Design File Compatibility: A Guide for Small Business Owners. Embroidery Today Magazine.
- Jones, M. (2021). Troubleshooting USB Import Issues for Computerized Embroidery Machines. Sewing & Embroidery Tech Journal.
- Global Textile Association. (2023). Best Practices for Importing Pre-Made Embroidery Designs. Industry Technical Bulletin.
Yiwu Kuhao Import and Export Co., Ltd.
As one of the most professional computerized embroidery machine manufacturers in China, our products have good reputation in the market. Welcome to buy discount computerized embroidery machine made in China here and get quotation from our factory. All customized products are with high quality and low price.
Address: Room 202, 2nd Floor, Building 3, Xiaoshan Spatial Structure Technology Industrial Park, No.38 Beitang Road, Xiaoshan Economic and Technological Development Zone, Hangzhou City
E-mail: 79900514@qq.com
WebSite: https://www.kuhaoembroidery.com/
